How to take product photos using your phone
Part of the series How to create great online images
Photographing merchandise or 'products' is different from getting shots of your team or shows or workshops or your building.
With products, there needs to be a very clear focus on one thing. That one thing needs to be shown accurately, so that people can get an idea of its shape, size, colour, detail, and how it can be used. And it needs to be depicted in its best light – literally.
Why does your product photography matter?
Images are a key tool in the customer decision-making process. When someone's considering buying something, the product image is often part of their first impression.
It helps online shoppers to understand what to expect from a product in a way that words can’t clearly express. And it can even determine whether or not someone makes a purchase. (When was the last time you bought a product online without seeing a photo of it first?)
There's so much choice for people buying online. Or, to look at it another way, there's a lot of competition when selling online. So, if your products look dull or out-of-focus or unclear or unprofessional, this can erode trust. And someone may well choose not to buy.
Not only might potential customers leave your website without buying; they could carry that negative impression with them into any future interactions they have with your organisation. Have you only lost-out on that one sale – or on the sale of other products, or ticket purchases, or donations in future?
In an ideal world, your merchandise would be photographed by a professional (see: How to find and brief a photographer).
As professional photography isn't always possible or practical, this post is all about giving you some handy pointers for taking the best possible product photos with your smartphone.
Things to consider
?️ Plain background or lifestyle, in-situ shot?
Products photographed on a plain (often white) background are commonplace for a reason.
There's a clear focus on the specific product you're selling. Lighting and angles can be adjusted appropriately. And it ensures consistency across any number of products in an online shop. There's something quite 'honest' about products placed on a plain background.
Lifestyle shots – where a product is photographed being used, or alongside other objects as part of a 'set' – take more work. Both in terms of what will work best for the product, and the time it takes to set up and light that shot.
But they can help add an emotional connection, and are better at instilling 'desire' – by helping potential customers picture that product in a real-life context. Perhaps someone's holding or using the product? Maybe the product is placed on a table, surrounded by other objects, yet still the focus of attention? Be aware that users may be confused about what it is they're buying if you're not super-careful about how a product is shown when in-situ.
If in doubt, or if you've not done any product photography before, it's probably wise to opt for a plain background. You can always create additional lifestyle shots at a later date.
? How many products are you photographing?
Setting up your makeshift studio will take time and effort. So, make the most of it by photographing a number of products at once. This not only makes better use of your time and resources, but helps to create consistency of images across multiple products.
? How many angles do you need to show?
Sometimes it will be fine to show a single image of a product – say, a book, a script, or a print. But it can be helpful for people to see certain objects from several different angles.
TIP: When planning what angles to shoot, imagine describing the product to someone over the phone. What are the essentials that someone needs to know in order to get an accurate idea of the product? Make sure you photograph those things!
Help people to understand its shape and other details:
- Does it have a pattern that needs a separate close-up?
- Or features on the back that it would be useful to show?
- Would shooting it at a 90-degree angle be more useful than head-on?
- Would an overhead shot add to a potential buyer's understanding of the product?
? How many images do you need for each product?
If you're not sure how many images you'll need for each product, err on the side of caution and take more than you think you'll need. You can always edit them afterwards, and it will make your life easier to have too many than not enough.
Equipment list
- Smartphone with a decent quality camera
- Mini tripod
- Backdrop (White card, wallpaper, or the back of a roll of wrapping paper)
- Table
- Chair (Optional: if you need it for draping your backdrop)
- White tissue paper and some tape (Optional: for diffusing harsh light)
- Light source/s
- Your post-production tool/s of choice
That's what you need; here's how to use it …
How-to:
Create your background
If you’re aiming for a white background, you could invest in a lightbox. But a roll of paper – wallpaper, or even the back of (thick-ish) wrapping paper – can work well.
Your best-bet is to set up your background on a table, to make it easier to adjust angles, switch-out to a new product, or place any light sources.
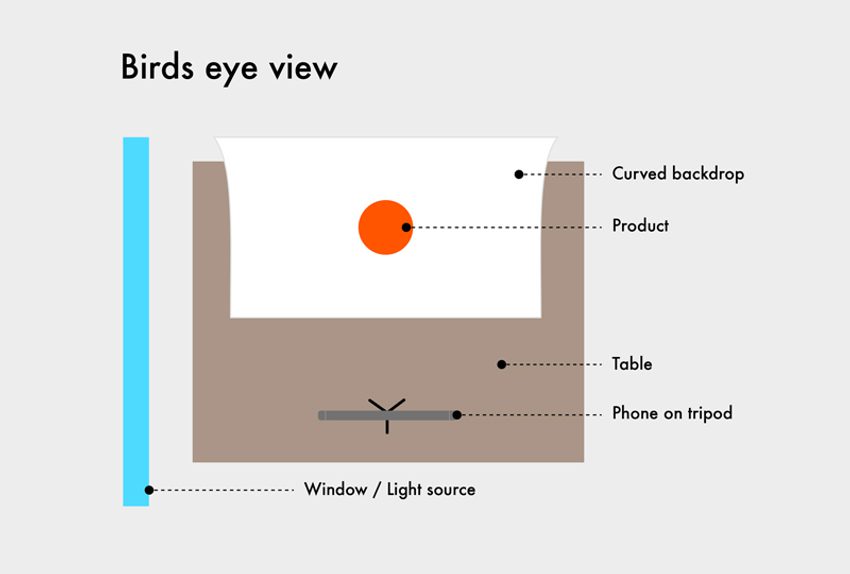
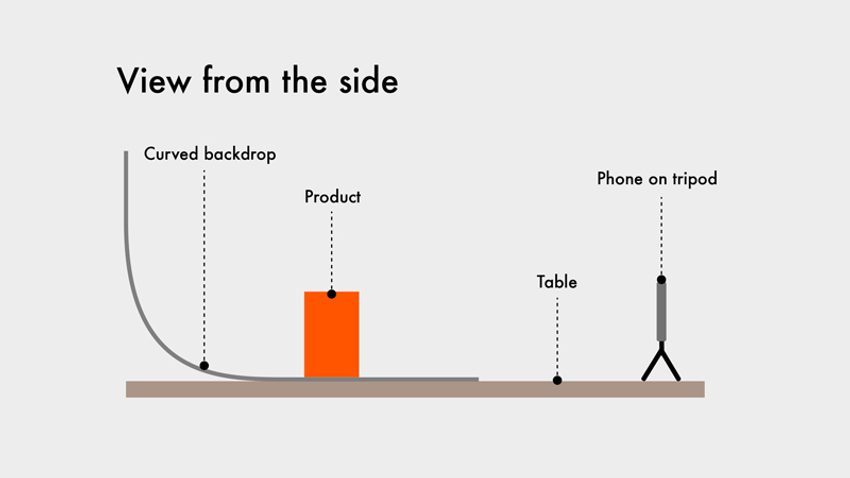
Create a softly curved backdrop with your paper by laying it out on the table, then draping it over the back of a chair. This creates an 'infinity curve' – which helps create the impression your product is floating.
TIP: Make sure the backdrop is clean and doesn't have any creases, as imperfections can show up on your photos.
Set up your camera (on a tripod)
Assuming you're using a fairly modern smartphone with a high quality camera , the main piece of advice here is to invest in a tripod.
You can get mini tripods for phones reasonably cheaply – and they really will make things much easier, and create a better end result.
Using a tripod will:
- Prevent blur – from camera-shake due to long shutter speed
- Keep your camera still while you adjust the product, or the lighting
- Make it much easier to make slight angle adjustments to the camera itself (than if you were holding the phone, or propping it up in a makeshift way).
Get the lighting right
One of the main factors that can make or break an image is the lighting. You can have the best camera in the world, a beautiful product, a wonderful backdrop, and endless amounts of time – but if the lighting is poor, the resulting image will be too.
Natural light
If at all possible, use natural light. Although it can be prone to changing, it has the best chance of making your photo look great. (It's a good idea to check the weather forecast before shooting – an overcast day is better than a really sunny one ⛅)
If you have access to a room with a big window or windows, that's ideal. The bigger the window, the more natural light you'll have.
Placing your product near the window, at 90 degrees to it, will create a softer light with minimal shadow.
If you find that the light coming in is too harsh, you could try diffusing it with some (white) tissue paper or parchment paper hung across the window. You can also avoid times of day when light is streaming directly through the window; remember, we're looking for soft, diffused light rather than strong beams.
Artificial light
If you opt for artificial lighting, you may need several lights. But be aware of the type of bulb in each light source. They should be the same colour or you’ll end up with unnatural colours in your photos.
Position your main light source – desk lamps with bendable necks can work well – to the side of the product, so that light 'wraps around' it. Lighting a product from the front can create harsh shadows, and highlights in any reflective surfaces – so shooting with on-phone flash should be avoided.
Whether you're using natural or artificial light …
As it's so important for quality images, spend time experimenting with your lighting until you get it right. The great thing about digital photography is that you can check each image as you go, and stop tweaking once you get the lighting right.

Your finished set up should look a little like this:

Diy product photo side view
Editing
You have a set of shots you're happy with. Great! Now it's time to edit them. It may be helpful to refer back to our tips about what makes a great image, in The power of images.
Concentrating on one product at a time: review all of your images, and choose the shot or shots which show that product accurately, and at its best. Particularly for someone who's never seen that product in the flesh. You may pick a single image for some products. But it may be helpful to have several images of other products, in order to create a true impression.
TIP: The images you reject might still come in handy, so don't delete them right away.
Post-production
Using your image processing tool of choice, think about whether any of your selected images have dust-flecks that need removing? Or particularly harsh shadows that could do with being muted? Did the light change, meaning the colours look different between shots of the same product?
If you don't have a favourite post-production tool, or a designer or digital content specialist who can help, here're some image editing tools that're all available on both iOS and Android devices:
Photoshop Express – Get some of the most useful of Photoshop's editing features – adjusting hue, brightness, exposure etc – on your smartphone. You can take your product photos from your phone, or take them inside the app.
Lightroom – Easy to use sliders, and pre-sets to create a 'template' style. You'll need an Adobe Creative Cloud licence to make use of all features – but this may be worth the investment to have images synced across devices.
VSCO – Includes basic editing tools such as exposure, contrast, and colour balance, as well as a large library of Insta-friendly filters. It's good for 'enhancing' images so may not always be the best choice.
Other tools are available!
Once your images look just right, it's time to prepare them for your website – making sure they're the correct dimensions, file size, and file format. In our final How to create great online images post, James shares some handy jargon-busting and technical information to help you to prepare images for your website.
Sign up to our Mailing List for more handy resources, sector insights, and invitations to our FREE online talks and events.
